Understanding Gate Motor Components and Wiring Basics
Types of Gate Motors – Different types of gate motors (LR, swing, sliding, underground) and their wiring needs
Understanding the inner workings of a gate motor is crucial when learning how to connect gate motor systems effectively. Each component, from the control board to the motor armature, plays a vital role in ensuring seamless operation. Proper wiring not only guarantees safety but also enhances the durability of your automation system. The wiring basics involve connecting power supply lines, control inputs, and safety sensors, all while adhering to local electrical standards. When it comes to different types of gate motors—such as swing, sliding, underground, or LR (Line-Runner)—the wiring needs vary considerably. For example, sliding gate motors typically require a more robust power connection and specific control wiring, whereas underground motors demand careful insulation and waterproofing. Knowing these nuances helps in troubleshooting and maintaining your gate automation, making the process of how to connect gate motor both straightforward and reliable.
Essential Components – Power supply, control panels, limit switches, photocells, remote receivers
Understanding the intricate web of gate motor components is essential for anyone venturing into the realm of automation. Behind the sleek exterior and smooth operation lies a complex network of elements that must harmonize flawlessly. At the heart of this system are the power supply, control panels, limit switches, photocells, and remote receivers—each playing a pivotal role in ensuring seamless function. Recognizing how these components interact can transform a daunting task into a straightforward process, provided one approaches it with clarity and precision.
When considering how to connect gate motor systems, it’s vital to grasp the significance of proper wiring—an act that safeguards both functionality and safety. The wiring basics involve meticulous connections: power lines must be robust enough to handle the motor’s load, control inputs should be wired to allow effortless command, and safety sensors like photocells need correct placement and insulative protection. These elements, when correctly integrated, create a resilient automation setup capable of withstanding South Africa’s diverse environmental conditions.
In practice, a clear understanding of components can be summarized through essential elements such as:
- Power supply connections that sustain continuous operation
- Control panels that act as the nerve center for commands
- Limit switches and photocells that prevent accidents and ensure precise movement
- Remote receivers that facilitate user-friendly access
Mastering how to connect gate motor hinges on appreciating the nuanced roles these parts play and ensuring their wiring conforms to local electrical standards. This knowledge not only enhances the longevity of your system but also transforms the installation into an intuitive, even satisfying, endeavor—one that keeps South African properties secure and accessible with confidence.
Tools Needed – Wire strippers, screwdrivers, drill, measuring tape, voltage tester
Mastering the art of how to connect gate motor is akin to unlocking a hidden portal within your property’s fortress. Every connection, every wire, is a thread woven into a tapestry of security and seamless operation. Understanding the core components, from the power supply to control panels, forms the foundation of this intricate dance—yet, the true magic lies in the wiring. It’s a meticulous craft, where precision safeguards durability and safety in South Africa’s diverse climate.
Equipping yourself with the right tools transforms this seemingly daunting task into a rewarding journey. Essential tools include wire strippers to delicately unveil the conductor’s soul, screwdrivers to secure the vital links, and a drill to carve pathways for cables. A measuring tape ensures each wire finds its destined place, while a voltage tester confirms the current’s rightful flow—each instrument a vital spell in your arsenal.
In this mystical process, following a logical sequence enhances clarity. For example, connecting the power supply first ignites the system’s heartbeat, while wiring control panels grants mastery over commands. Adding limit switches and photocells acts as vigilant guardians, preventing mishaps and ensuring precise gate movement. Remember, a well-wired system isn’t just about functionality; it embodies resilience, ready to face South Africa’s environmental challenges head-on.
Preparing to Connect Your Gate Motor
Gathering Necessary Materials – List of all components and tools
Connecting a gate motor requires careful preparation; skipping this step can lead to frustrating setbacks. Before diving into the wiring process, gather all essential materials. This includes the specific power supply suitable for your gate motor, control panels, limit switches, photocells, and remote receivers. Having these components on hand ensures a smoother installation process and minimizes trips to the hardware store.
In addition, assemble the necessary tools for the job. Wire strippers, screwdrivers, a drill, measuring tape, and a voltage tester are indispensable. These tools help ensure that every connection is secure and safe, preventing future electrical issues.
It’s wise to check your components against your gate motor’s wiring diagram, making sure everything aligns perfectly. This initial step—preparing to connect your gate motor—sets the stage for a successful installation, avoiding costly mistakes down the line.
Safety Precautions – Switching off power, ensuring proper grounding, wearing safety gear
In the shadowed corridors of automation, safety is the silent sentinel that guards your domain. Before embarking on the journey of how to connect gate motor, it is paramount to heed the dark whisper of caution—power must be switched off. This act is not mere ritual but a necessary shield against unseen currents that lurk beneath the surface, eager to claim the unwary.
Ensure proper grounding of the system—an anchor in the storm of electricity—lest stray voltages awaken chaos within your installation. Donning safety gear transforms from a mundane task into a ritual of protection; gloves, goggles, and insulated tools become your armor against potential hazards. Remember, even the most intricate wiring can turn hazardous if safety is neglected.
Once the power is severed, check and double-check your components with the wiring diagram—precision is the key to unlocking the secrets of how to connect gate motor. Only when all connections are secure and grounded correctly can your automation breathe life, free from the dread of electrical calamities. Safety isn’t just a step—it’s the foundation of a successful, enduring installation.
Reading Manufacturer Instructions – Understanding specific wiring diagrams and instructions for your gate motor model
In the labyrinth of automation, understanding how to connect gate motor is akin to deciphering a secret code—each wire and connection a vital glyph in the language of seamless access. Before embarking on this intricate dance, it’s essential to immerse oneself in the manufacturer’s instructions; these serve as a vital map guiding every twist and turn of your wiring voyage. Each model whispers its unique tale through specific wiring diagrams, revealing the exact pathways that breathe life into your gate system.
Take a moment to study these instructions carefully, for they hold the keys to ensuring safety and functionality. Manufacturers often provide detailed diagrams, illustrating component placements and wiring routes—an invaluable resource that transforms confusion into clarity. Remember, these diagrams are not merely illustrations but sacred scripts that safeguard your installation from future mishaps.
To truly master how to connect gate motor, it’s prudent to gather all necessary components and tools beforehand. Ensuring every element aligns with the manufacturer’s specifications minimizes the risk of errors. With patience and precision, follow the diagrams step-by-step, visualizing each connection as a vital artery fueling your automated gateway’s heartbeat.
Connecting the Power Supply
Locating Power Source – Identifying the correct electrical outlet or inverter connection
Connecting the power supply to your gate motor might seem straightforward, but in reality, it’s an exercise in precision and patience. South Africa’s electrical standards demand careful attention to grounding and circuit integrity, ensuring that your automated gate functions flawlessly without risking safety or damage. Before diving into the connection, verify that the power source is suitable—preferably a dedicated outlet or inverter connection that can handle the motor’s voltage and current requirements.
Locating the correct electrical outlet is crucial. Ideally, the power source should be close to the gate’s control panel to minimize wiring length and voltage drop. If an existing socket isn’t available, installing a new, properly grounded outlet might be necessary. For added safety, consider using a residual current device (RCD) in your setup, which acts as a safeguard against electrical faults. Remember, understanding how to connect gate motor safely involves respecting these electrical nuances and ensuring the circuit is isolated before any work begins.
In some cases, it’s wise to prepare an ordered list of the steps involved:
- Switch off the main power supply to prevent accidental shocks.
- Identify and test the outlet or inverter connection with a voltage tester.
- Ensure the power source matches the motor’s specifications—overloading can be disastrous.
- Connect the motor’s power input to the identified electrical outlet or inverter, following the wiring diagram provided by the manufacturer.
- Double-check all connections before restoring power.
Mastering how to connect gate motor properly turns a mundane task into a seamless process, safeguarding both your investment and peace of mind. After all, a well-powered gate is the cornerstone of a secure, stylish South African home.
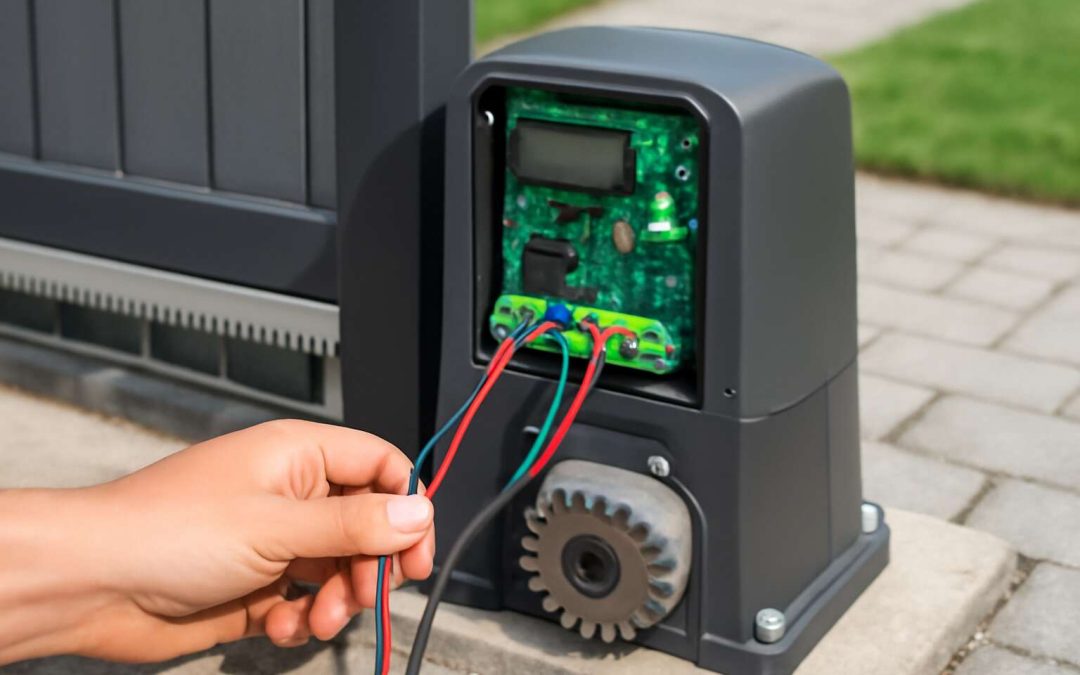
Wiring Power to the Motor – Step-by-step guide to connect live, neutral, and earth wires
Connecting the power supply wiring to your gate motor is a pivotal step that demands meticulous attention. Properly connecting live, neutral, and earth wires ensures the motor functions efficiently while safeguarding against electrical faults. When wiring your gate motor, always start by switching off the main power to prevent any accidental shocks. Using a reliable voltage tester, verify that the power source—be it a dedicated outlet or inverter connection—is live and matches the motor’s voltage specifications.
Next, follow the wiring diagram carefully, which typically indicates where each wire should connect. Most gate motors have clearly marked terminals for live, neutral, and earth wires. Using a screwdriver, securely fasten each wire into its respective terminal, ensuring there are no loose connections that could cause sparks or malfunctions. For added safety, double-check that the earth wire is connected to the grounding terminal, grounding your installation according to South African electrical standards.
- Identify and strip the insulation from the wires, exposing enough copper to make a solid connection.
- Connect the live wire to the terminal marked ‘L’ or ‘Live’.
- Attach the neutral wire to the terminal marked ‘N’ or ‘Neutral’.
- Secure the earth wire to the grounding terminal, often marked with a symbol or ‘E’.
Once all wires are firmly in place, visually inspect each connection, ensuring no stray strands are exposed, which could cause short circuits. Restoring power only after confirming the wiring is correct guarantees a safe and smooth start for your gate motor. Remember, mastering how to connect gate motor wiring isn’t just about functionality; it’s about creating a reliable, long-lasting automation system that enhances your property’s security and convenience.
Checking for Proper Grounding – Ensuring safety and compliance with electrical standards
Ensuring proper grounding when connecting the power supply to your gate motor is not just a matter of compliance; it’s the cornerstone of safety. A well-grounded system prevents electrical faults that could compromise your security and endanger your loved ones. In South Africa, where electrical standards are strict, verifying proper grounding is a step that should never be overlooked.
Start by inspecting your grounding terminal—often marked with a symbol or an ‘E’. Use a reliable voltage tester to confirm that the power source is correctly grounded. If your system lacks a solid ground connection, it’s wise to consult an electrician to rectify the issue. Remember, grounding isn’t merely about following regulations; it’s about peace of mind during stormy nights when your gate motor is working tirelessly to secure your property.
- Check that the earth wire is securely attached to the grounding terminal.
- Ensure no stray strands of wire are exposed, which could cause short circuits or sparks.
- Confirm the grounding pathway aligns with South African electrical standards for safety and durability.
When learning how to connect gate motor wiring, proper grounding acts as the safety net that protects both your electrical system and your family. It’s a vital step in creating a reliable, long-lasting automation solution that seamlessly blends convenience with security.
Connecting Control Buttons and Remote Receivers
Wiring Control Buttons – Connecting manual controls on the gate and safety features
Connecting control buttons and remote receivers is the heartbeat of a reliable gate automation system. When you grasp the essence of how to connect gate motor, this step transforms from a daunting task into a seamless process. The control buttons serve as the direct link between user intent and motor action, making their wiring pivotal for safe, efficient operation.
Wiring control buttons involves running insulated cables from the manual controls to the control panel. Typically, this means connecting the positive and negative terminals, ensuring correct polarity to avoid malfunctions. Safety features, such as photocells and emergency stop buttons, must be integrated carefully to prevent accidents. These components act as guardians, safeguarding humans and vehicles alike.
For remote receivers, proper connection ensures smooth wireless command reception. Usually, this entails linking the receiver to the control panel, respecting the manufacturer’s wiring diagram. Remember, a secure and organized wiring setup not only prolongs the life of your gate motor but also reduces maintenance hassles. When you understand how to connect gate motor with precision, you unlock a world of convenience and safety for your property.
Installing Remote Receivers – Positioning and wiring for remote control operation
In the realm of gate automation, the secret to seamless operation lies in the art of connecting control components with finesse. When you master how to connect gate motor with the precision required, you open the gateway to safety, efficiency, and long-lasting performance. One of the pivotal steps involves installing remote receivers—these are the enchanted scrolls that receive wireless commands and translate them into motion. Proper positioning ensures reliable signal reception, whether mounted on the gate frame or nearby wall, away from interference.
Wiring remote receivers demands careful attention. Respect the manufacturer’s wiring diagram, connecting the receiver to the control panel with insulated cables that respect polarity. For added security, organize the wiring neatly—an unordered tangle is a harbinger of future trouble. Remember, the remote receiver acts as the bridge between your handheld remote control and the gate motor. When installed correctly, it offers effortless operation at the tap of a button.
For manual control buttons, the process is equally vital. Running insulated wires from the control buttons to the control panel forms the backbone of manual operation. An unordered list of key steps highlights the process:
- Identify the control panel terminals designated for manual controls
- Run insulated cables, ensuring correct polarity and secure connections
- Integrate safety features like photocells and emergency stops into the wiring loop
Ensuring these elements are flawlessly wired is essential for the safety and longevity of your gate system. Whether you’re wiring control buttons or installing remote receivers, understanding how to connect gate motor components with clarity transforms a complex task into a straightforward procedure. It’s the magic behind reliable automation, making your property safer and more accessible every day.
Configuring Limit Switches – Setting up limit switches to stop the gate at desired positions
Connecting control buttons and remote receivers is the heartbeat of a seamlessly functioning gate motor system. The process transforms a simple push or remote command into smooth, automated motion—an invisible force guiding the gate’s every move. When you learn how to connect gate motor components accurately, you unlock the secret to a reliable and safe automation setup. Proper wiring ensures that manual controls respond instantly, while remote receivers stay receptive to wireless commands from a distance.
Positioning the remote receiver correctly is crucial. It should be mounted away from interference sources, such as thick metal or electronic devices, to maintain a strong signal. When wiring the receiver, respect the manufacturer’s diagram—using insulated cables and ensuring polarity is correct. Connecting control buttons involves running insulated wires from the designated terminals on the control panel to the manual control points. These wires must be secure and neatly organized, preventing future troubleshooting headaches.
To set up limit switches—those invisible guardians that stop the gate at the perfect position—you’ll need to configure them precisely. These switches act as the gate’s conscience, preventing over-travel and potential damage. Typically, limit switches are wired in series with the control circuit, and their placement depends on the gate’s desired open and close positions. It’s essential to calibrate them correctly, ensuring they activate exactly when the gate reaches its intended stop point. This meticulous setup guarantees the gate operates flawlessly, every time.
Testing the Gate Motor Connection
Initial Power Test – Powering the system and observing for correct operation
In the shadowed silence of an evening, the unseen forces behind a gate motor stir to life. Before unleashing its full might, a crucial step must be undertaken—testing the initial power connection. This is the moment where all the meticulous wiring and careful installation converge into a single, electrifying pulse. Powering the system and observing for correct operation is the gateway to ensuring your gate functions flawlessly, echoing the precision of a master craftsman’s touch.
The first test is deceptively simple, yet profoundly revealing. Carefully switch on the power supply, watching closely for any irregular flickers or sparks that might betray hidden faults. As the motor hums to life, listen for smooth, consistent operation—any grinding or hesitation suggests a misstep in wiring. During this phase, it’s wise to have a voltage tester at hand, ready to confirm that the correct current reaches the motor’s core. This initial power test not only verifies the integrity of your wiring but also sets the stage for a seamless, secure gate operation.
To ensure everything runs as it should, consider a quick checklist:
- Check that the power source is stable and correctly wired.
- Observe the motor’s response—does it start and stop without hesitation?
- Look for any unusual sounds or vibrations that hint at misaligned wiring or faulty connections.
In this dark dance of electricity and mechanics, the question of how to connect gate motor becomes clearer with each successful test, revealing the hidden symphony of components working in harmony beneath the surface of the mundane. Only after this initial power test can you proceed confidently, knowing that the unseen forces fueling your gateway are steadfast and true.
Troubleshooting Common Issues – Addressing wiring errors, loose connections, or faulty components
In the meticulous dance of installation, troubleshooting how to connect gate motor can sometimes feel like deciphering a complex code written in electricity and mechanics. When wiring issues surface—be it miswired control panels, loose connections, or faulty components—the entire system risks falling into disarray. These errors can be subtle yet devastating, causing erratic operation or complete failure. Recognizing the telltale signs of wiring faults—such as inconsistent responses or unusual noises—is crucial in maintaining the integrity of your gate’s functionality.
Addressing these issues demands a keen eye and patience. Begin by inspecting all wiring connections, ensuring each wire is firmly secured and correctly matched to its designated terminal. Loose connections are often the silent saboteurs in gate motor operation; they can generate sparks or intermittent signals, leading to unpredictable gate movements. For a thorough diagnosis, employing a voltage tester becomes indispensable—confirming that the correct current reaches every component and ruling out power supply irregularities.
Common troubleshooting steps include:
- Checking for damaged or frayed wires that might cause shorts or open circuits.
- Verifying that control buttons and remote receivers are wired according to manufacturer specifications.
- Ensuring limit switches and photocells are correctly connected, as faulty wiring here can prevent the gate from stopping at desired points.
Sometimes, the issue lies deeper—perhaps a faulty component within the control panel or a misaligned limit switch. Carefully retracing your wiring steps, referencing the specific wiring diagram for your gate motor model, can illuminate the root cause. Remember, the essence of understanding how to connect gate motor is not just about physical connections but about fostering harmony within the system—where each wire and component plays its role with precision, culminating in seamless, secure gate operation.
Adjusting Limit Settings – Configuring open/close limits for safe operation
Mastery over how to connect gate motor extends beyond mere wiring; it embodies a nuanced understanding of system harmony and precision. Once the initial connections are made, the journey into testing the gate motor connection becomes a critical phase—an intricate dance where every component’s response reveals the system’s true integrity. Adjusting limit settings isn’t just about safety; it’s about crafting a seamless experience where the gate’s open and close points are perfectly calibrated, ensuring both security and longevity.
This process involves fine-tuning the limit switches—those silent guardians that halt the gate at its designated stopping points. Properly configuring open/close limits prevents the gate from overextending or halting prematurely, which could otherwise lead to mechanical stress or operational failure. To do this effectively, it’s essential to observe the gate’s movement carefully while making incremental adjustments—each turn of the limit switch could be the difference between smooth operation and a system in disarray.
During this crucial phase, a systematic approach can be particularly beneficial. First, ensure that the power is safely switched off before making any adjustments. Then, power up the system and manually observe the gate’s movement. If the gate closes too far or doesn’t fully open, it’s time to revisit your limit switch settings.
- Activate the limit switch adjustment on your control panel or via the remote interface.
- Observe the gate as it approaches its designated stopping point.
- Adjust the limit switch slightly—either clockwise or counterclockwise—until the gate halts precisely where intended.
- Repeat the process for both open and close limits, ensuring a perfect balance between safety and convenience.
Remember, when configuring open/close limits, patience is paramount. Each small tweak can profoundly influence how the system functions—transforming a tentative setup into a symphony of mechanical precision. This meticulous calibration underscores the importance of understanding how to connect gate motor in a manner that ensures the entire system operates flawlessly, delivering security and peace of mind for years to come.
Additional Features and Enhancements
Connecting Safety Sensors – Wiring photocells or safety beams to prevent accidents
Integrating safety sensors into your gate motor setup isn’t just about ticking boxes; it’s about preventing those awkward, expensive accidents that make your heart skip a beat—literally. Photocells and safety beams act like vigilant guards, ensuring that no unsuspecting pedestrian or pet becomes a casualty of your automated gate. Connecting these safety sensors to your gate motor is a straightforward process, but one that demands attention to detail. Proper wiring of photocells or safety beams creates an invisible shield, seamlessly halting the gate if anything crosses its path.
When considering how to connect gate motor safety sensors, remember that a reliable connection is key. Use high-quality, weather-resistant wiring, and ensure that sensors are aligned precisely. Typically, these sensors are wired in parallel to the control panel, so if one detects an obstacle, it signals the motor to stop. To streamline the process, here’s a quick rundown:
- Identify the sensor input terminals on your control panel.
- Connect photocell or safety beam wires according to the manufacturer’s diagram—usually positive, negative, and signal lines.
- Test the setup by placing an object in front of the sensors to verify the safety feature’s efficacy.
Remember, connecting safety sensors not only enhances the security of your automated gate but also provides peace of mind, knowing that your gate isn’t a danger zone. Proper wiring and calibration ensure these safety features function flawlessly when needed most, making your gate smarter and safer on the South African streets.
Integrating Automation Systems – Linking with home automation or access control systems
Integrating additional features like home automation systems or access control can elevate your gate from mere convenience to a fortress of smart security. Linking your gate motor with your existing home automation setup isn’t just a flashy upgrade; it’s a practical move that adds layers of control and peace of mind. Imagine opening your gate with a simple voice command or remotely checking if it’s securely closed—welcome to the future of South African driveway management!
The process of how to connect gate motor with these advanced systems involves a few key steps. First, identify the communication ports on your control panel—these are the gateways for your automation signals. Many modern gate motors support integration via wired or wireless interfaces, making setup surprisingly straightforward. You might need to install a compatible automation interface or controller module, which acts as a bridge between your gate motor and your home automation hub.
To ensure seamless operation, consider using
- Zigbee
- Z-Wave
or Wi-Fi modules, depending on your system’s compatibility. These enable the gate motor to communicate with your smartphone or home assistant effortlessly. Connecting the automation system also involves configuring the control settings—most manufacturers provide detailed instructions for linking their products, so don’t skip the reading! When done correctly, this integration allows you to automate opening and closing schedules, grant access to visitors remotely, or even set up visitor logs—perfect for the tech-savvy South African homeowner.
So, how to connect gate motor to your home automation system is less about complex wiring and more about understanding the compatibility and communication protocols. With a little tech-savvy and patience, your gate becomes a part of your smart home ecosystem, enhancing both convenience and security—because in South Africa, a gate that’s smarter than your neighbor’s is undeniably a status symbol.
Regular Maintenance Tips – Ensuring long-term reliable operation of your gate motor
Maintaining a gate motor isn’t just about functionality; it’s about ensuring long-term reliability and security for your property. Regular maintenance enhances the lifespan of your gate motor and keeps it operating smoothly in South Africa’s demanding climate. Simple steps like cleaning components, lubricating moving parts, and inspecting wiring connections can prevent costly breakdowns. Additionally, testing safety features such as photocells and limit switches regularly ensures they work effectively, protecting loved ones and visitors alike.
For those wondering how to connect gate motor to automation systems, consistent upkeep is vital. A well-maintained system minimizes the risk of wiring faults or sensor failures that could compromise security. Consider scheduling routine checks—every few months—to verify the integrity of control panels and remote receivers. This proactive approach not only prolongs the life of your automation setup but also keeps your property secure and accessible at all times.