Understanding Gate Motor Installation
What is a Gate Motor?
Imagine a world where your driveway greets you with a smooth, effortless swing—no more fumbling for keys or wrestling with stubborn gates. That’s where a gate motor becomes the unsung hero of modern security and convenience. Installing gate motor isn’t just about adding a fancy gadget; it’s about embracing technological wizardry that transforms your property into a fortress of ease.
What exactly is a gate motor? In simple terms, it’s a compact powerhouse that automates the opening and closing of your gate, replacing the old manual tug-of-war. Usually powered by electricity or solar energy, it works silently behind the scenes, giving your gate a new lease on life. From sliding to swing gates, each type of gate motor has its own quirks, making understanding the installation process essential for a seamless upgrade.
When installing gate motor, it’s crucial to consider factors like gate weight, size, and the terrain—because not all motors are created equal. Here’s a quick rundown of what to keep in mind:
- Ensuring the power supply is reliable and safe.
- Choosing the right motor type for your gate—sliding or swinging.
- Properly anchoring the motor to withstand South Africa’s unpredictable weather.
Getting these details right guarantees your investment in installing gate motor will deliver years of hassle-free operation—no more manual labor, just the luxury of a press of a button.
Benefits of Installing a Gate Motor
Imagine a morning where the hum of your gate motor whispers a promise of effortless elegance—no more fumbling in the dim dawn or wrestling against stubborn iron. Installing gate motor is more than a mere upgrade; it’s an enchanting symphony of modern convenience and security, transforming your driveway into a sanctuary of ease. The benefits ripple beyond mere convenience, weaving into the very fabric of your property’s safety and aesthetic appeal.
When installing gate motor, the magic lies in its silent promise of reliability and seamless operation. It liberates you from manual toil, offering a reliable, automated gateway that responds to the gentle press of a button. From the sturdy swing gates to sleek sliding mechanisms, each installation enhances security while elevating the overall charm of your home. The right choice of motor—considering gate weight, terrain, and weather resilience—ensures longevity and trouble-free performance.
Ultimately, installing gate motor isn’t just about adding a gadget; it’s about embracing a new era of comfort and protection. With each precise installation, your property becomes a fortress of ease, where technology and security dance in perfect harmony—ready to greet you with the effortless glide of a modern marvel.
Types of Gate Motors Available
When it comes to installing gate motor, understanding the different types available can make all the difference between a smooth operation and a frustrating ordeal. South Africa’s diverse terrain and weather conditions demand a choice that’s not only efficient but also resilient. Fortunately, the options are quite varied, each designed to cater to specific needs and gate types.
There are primarily two categories of gate motors that dominate the market: swing gate motors and sliding gate motors. Swing gate motors are perfect for traditional, double-leaf gates that swing open like the doors of a grand estate. On the other hand, sliding gate motors glide effortlessly along a track, ideal for properties with limited space or uneven terrain. Choosing the right motor depends on factors like gate weight, available space, and environmental conditions.
- **Swing Gate Motors**: These motors are typically mounted on either side of the gate and operate via hydraulic or electromechanical systems. They’re known for their sturdy build and ability to handle heavier gates.
- **Sliding Gate Motors**: Installed at the side or above the gate, these motors are sleek, space-saving, and perfect for gates that need to slide open, especially in tight spots.
In essence, installing gate motor isn’t a one-size-fits-all affair. The key is selecting a motor that aligns perfectly with your property’s unique demands, ensuring seamless operation and long-term durability.
Important Factors to Consider Before Installation
In the grand orchestration of securing your sanctuary, installing gate motor becomes the crescendo—an essential symphony of safety and convenience. Yet, beneath the sleek exterior lies a labyrinth of considerations that demand careful navigation. The terrain of South Africa, with its rugged beauty and unpredictable weather, whispers secrets that only seasoned installers comprehend. To truly master the art, one must delve into the intricacies that influence a flawless installation.
One cannot ignore the importance of evaluating environmental factors—such as wind exposure, humidity, and ground stability—that can transform a straightforward project into a saga of unforeseen challenges. Moreover, the weight and size of the gate itself dictate the choice of motor, ensuring power meets purpose. For those contemplating the installation process, a thorough assessment of space—both for swing or sliding gates—is paramount. This is where the art lies: selecting a motor that harmonizes with the property’s unique landscape, ensuring durability and seamless operation for years to come.
Preparing for Gate Motor Installation
Assessing Your Gate and Property
Embarking on the journey of installing gate motor begins well before the first tool is lifted. Your gate and property are the canvas upon which this transformation will unfold, so a meticulous assessment is essential. Think of your gate as a silent guardian—its weight, material, and swing mechanism all influence the type of gate motor needed. Analyzing the terrain and surrounding environment helps determine if additional features like safety sensors or backup power are necessary to ensure flawless operation.
Next, take a moment to scrutinize the existing infrastructure. Is the gate aligned properly? Are the hinges sturdy? Such details can make or break the success of installing gate motor. For instance, uneven ground might require leveling or reinforced foundations to support the motor’s weight and ensure smooth, silent operation. Understanding these nuances allows for a seamless installation that marries function with durability.
- Inspect the gate’s dimensions—height, width, and weight.
- Evaluate the power supply—will you need an outdoor outlet or solar options?
- Identify potential obstructions in the vicinity that could interfere with gate movement.
Every property holds its unique charm and challenges, and recognizing these subtle intricacies is the first step toward a harmonious installation process. With a keen eye and thoughtful planning, installing gate motor transforms from a mere upgrade into an elegant symphony of technology and craftsmanship, tailored perfectly to your South African sanctuary.
Choosing the Right Gate Motor
Embarking on the journey of installing gate motor is akin to composing a symphony—each element must harmonize perfectly. The first note in this melody is selecting the right motor, a decision that transforms your property into a seamless blend of convenience and security. In South Africa’s diverse landscape, choosing a gate motor that withstands the elements—be it the relentless sun, gusting winds, or sudden downpours—is paramount.
To orchestrate this delicate process, consider your gate’s unique rhythm: its weight, swing mechanism, and material. An outdoor environment demands a motor with robust resilience, possibly supplemented by features like solar power or backup batteries. When preparing for installation, evaluate your power source—will an outdoor electrical outlet suffice, or is solar power the more sustainable, resilient choice? The right choice ensures your gate’s silent, smooth operation for years to come, making the installation of your gate motor not just a technical upgrade but a testament to thoughtful craftsmanship and foresight.
Gathering Necessary Tools and Equipment
Embarking on the journey of installing gate motor is akin to preparing for a grand adventure—every tool and piece of equipment is a vital artifact in your quest for seamless security and effortless access. To ensure your installation unfolds as smoothly as a well-choreographed dance, gather a comprehensive set of tools that will serve as your trusted allies. A sturdy drill, a set of screwdrivers, a measuring tape, and a level are essential companions in this undertaking. Additionally, safety gear such as gloves and goggles safeguard your quest from unforeseen mishaps.
Preparation extends beyond mere tools; it involves envisioning your space as a stage set for innovation. It’s wise to have the following items ready:
- Power supply sources (outdoor electrical outlet or solar panels)
- Mounting brackets and hardware
- Wiring and connectors designed for outdoor use
- Post concrete or ground anchors for stability
By meticulously assembling these elements, you lay the groundwork for a successful installing gate motor process—transforming a technical task into an artful craftsmanship that will serve your property for years to come. This careful preparation ensures that every bolt, wire, and component finds its perfect place in the symphony of automation.
Obtaining Permits and Compliance Checks
Embarking on the process of installing a gate motor requires more than just technical know-how; it demands adherence to local regulations and safety standards. In South Africa, obtaining the necessary permits is a crucial step that often goes overlooked by homeowners eager to enhance security. Skipping this step can lead to fines or even forced removal of your automated gate system.
Before starting, it’s essential to check with your local municipality or council offices about the specific requirements for installing gate motor. This could include compliance with electrical codes and safety regulations designed to protect both property owners and the community at large. In some cases, an inspection or approval may be necessary before proceeding with the installation process.
To streamline the process, consider creating an ordered checklist of steps to ensure all legal and safety protocols are met. This list might include:
- Securing necessary permits from local authorities
- Ensuring compliance with electrical safety standards
- Scheduling inspections if required by local regulations
Taking these precautions not only safeguards your investment but also guarantees that your project to install a gate motor remains within the bounds of South African law. It’s the difference between a smooth installation and a costly setback — so don’t cut corners when it comes to permits and compliance checks.
Step-by-Step Guide to Installing a Gate Motor
Safety Precautions and Best Practices
Installing a gate motor is not merely a mechanical task; it’s a delicate dance with safety, precision, and human instinct. A misstep can turn a simple upgrade into a hazardous ordeal, risking both property and lives. More than just connecting wires and mounting brackets, it’s about understanding the silent language of machinery and respecting the potential dangers lurking in its operation. The importance of adhering to safety precautions cannot be overstated — a single oversight can have irreversible consequences.
Before diving into the installation process, ensure all safety measures are in place. Disconnect the power supply before handling electrical connections and double-check that the area around the gate is clear of obstructions. When installing gate motor, consider the environment—uneven surfaces, proximity to pedestrians, and access points influence the layout and safety features. It’s wise to follow a structured approach, such as:
- Reviewing the manufacturer’s guidelines carefully
- Ensuring grounding and proper wiring techniques
- Testing the system thoroughly in a controlled environment
Meticulous planning and adherence to best practices during installing gate motor not only ensure smooth operation but also safeguard everyone involved from unforeseen hazards. The process demands patience, an understanding of human error, and a respect for the machinery’s potential to cause harm if mishandled. Only with these in mind can the installation truly serve its purpose—convenience intertwined with safety and durability.
Removing and Preparing the Existing Gate
Getting ready to install a gate motor? First things first, don’t rush in like a bull at a china shop. Removing and preparing the existing gate is a crucial step that can make or break your entire installation process. Think of it as giving your property a little TLC before the big upgrade—no one wants a motor churning away against a stubborn, rusted gate. Safety first: disconnect the power supply and ensure the area is clear of pets, children, and rogue garden gnomes. Once that’s sorted, carefully detach the hinges or tracks, depending on your gate type. This is where patience becomes your best friend. If your gate is heavy or unwieldy, enlist some help or use proper lifting tools—because no one wants a dropped gate or a strained back. With the old gate out of the way, you can now focus on preparing the foundation for your new gate motor, ensuring a level surface that supports smooth operation and longevity. Remember, a well-prepared base is the secret sauce for installing gate motor that runs like clockwork!
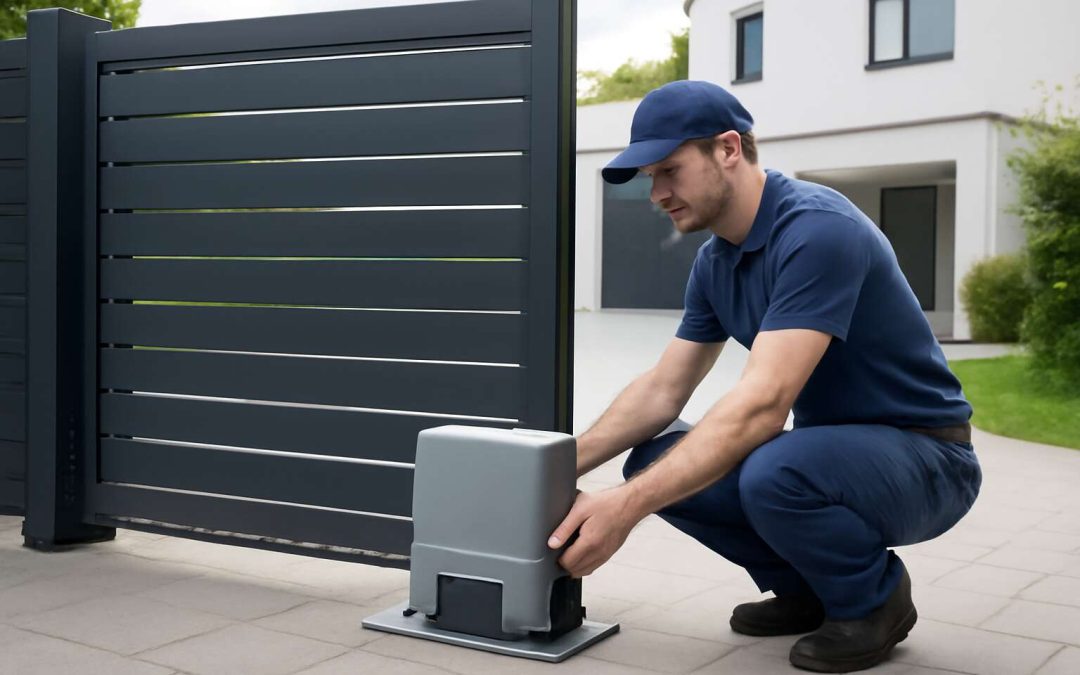
Installing the Gate Motor Bracket and Mounts
Installing a gate motor isn’t just about mounting a piece of equipment; it’s about creating a fortress of security and convenience for your property. The first step in this journey is attaching the gate motor bracket and mounts with precision. This isn’t a task to rush—think of it as laying the foundation of a castle. Proper placement ensures your gate operates smoothly and quietly for years to come.
Focus on positioning the bracket at the correct height, level and aligned with the gate’s hinge or track. Use a spirit level and measuring tape—these aren’t just tools, they’re your allies in achieving perfect balance. Once aligned, secure the mounts with heavy-duty bolts, making sure they’re tightly fastened to prevent any wobble or misalignment during operation.
In some cases, an ordered list can simplify the process:
- Mark the mounting points on the wall or post carefully.
- Drill holes suitable for the mounting bolts.
- Attach the bracket securely, checking for levelness at every step.
- Ensure the motor arm or arm extension lines up with the gate’s hinge or track.
Remember, installing gate motor components correctly is critical to avoiding future issues—precision here is the secret to a reliable, long-lasting automation system. With the brackets in place, the next phase of installation becomes far less daunting, paving the way for seamless gate automation that will stand the test of time.
Connecting Electrical Components
Connecting the electrical components is a critical phase in installing a gate motor. A secure and properly wired system ensures reliable operation and safety. Before starting, double-check that the power supply matches the specifications of your gate motor. Safety first: always disconnect the power before working on the wiring to avoid accidents.
Begin by identifying the main electrical terminals on the gate motor. Typically, these include the live, neutral, and earth connections. Use high-quality cables suitable for outdoor use to withstand South Africa’s climate. Carefully follow the wiring diagram provided by the manufacturer. Incorrect wiring can lead to motor failure or safety hazards.
To streamline the process, it helps to follow this simple ordered list:
- Connect the power supply to the motor’s main terminal block.
- Attach the control panel wires, ensuring correct polarity.
- Wire the safety sensors and photocells in parallel to the control circuit.
- Secure all connections with insulated connectors and tighten thoroughly.
After wiring, test the circuit with a multimeter to confirm voltage and continuity. Properly connecting electrical components during installing gate motor isn’t just about functionality — it’s about ensuring the system’s longevity and safety for everyone. When done right, your gate automation will operate smoothly, quietly, and reliably for years to come.
Configuring the Gate Motor Settings
Configuring your gate motor is where the magic truly begins. Once the electrical connections are secure, it’s time to fine-tune the system for seamless operation. This step transforms a simple motor into a reliable guardian of your property. The first move is to access the control panel, where a series of settings dictate how your gate will behave.
Most gate motors come with an intuitive interface, often featuring a digital display or a series of buttons. Carefully follow the manufacturer’s instructions to set parameters such as opening and closing limits, auto-close timers, and safety sensor responses. These configurations ensure your gate responds precisely to your needs, whether you want it to open with a push of a button or respond to remote control signals.
- Start by setting the limit switches—these determine how far the gate opens and closes, preventing over-travel that could damage the system.
- Next, adjust the auto-close timer if your gate motor offers this feature, ensuring it closes automatically after a safe interval.
- Finally, calibrate the safety sensors and photocells, which are crucial for preventing accidents—no one wants a sudden mishap during a routine access.
Take a moment to test the system thoroughly. When configured correctly, your gate will operate with confidence, quietly locking down your property and providing peace of mind. Remember, installing gate motor isn’t just about getting it to work—it’s about making sure it works perfectly for years to come.
Testing the Gate Operation
Once your gate motor is wired and configured, the moment of truth arrives—testing the gate operation. This phase reveals whether your meticulous installation has paid off or if adjustments are needed. A well-installed gate motor should operate smoothly, quietly, and with precise control, embodying the seamless fusion of technology and security.
Begin by slowly activating the system, either through the remote control or the control panel. Observe the gate’s movement carefully—does it open and close evenly? Is the speed appropriate, and are the limit switches functioning correctly? It’s essential to ensure the gate doesn’t over-travel, which can cause damage or safety issues.
For a thorough assessment, consider the following:
- Verify the auto-close feature, if installed, by setting the timer and confirming the gate closes automatically after the designated period.
- Test the safety sensors and photocells—these components are vital for preventing accidents, especially in busy residential or commercial settings.
- Check remote control responsiveness, ensuring signals transmit clearly and reliably from various distances.
Perform several cycles, noting any irregularities or unusual sounds. When the installation of your gate motor is executed with precision, this testing phase will demonstrate the reliability and durability of your work, transforming a simple gate into a formidable barrier with effortless grace. The magic of installing gate motor lies not just in activation but in the quiet confidence it instills—this is the true art of securing your property with elegance and ease.
Troubleshooting Common Installation Issues
Motor Not Responding
When embarking on the journey of installing gate motor, encountering a motor that simply won’t respond can be both frustrating and perplexing. In South Africa, where security and convenience often hinge on automated gate systems, understanding the root causes of these common issues is crucial. Sometimes, the problem lies in a simple oversight—like a loose wiring connection or an improperly programmed control panel—that can be rectified with a keen eye and patience. Other times, the motor’s responsiveness is hindered by power supply disruptions or faulty remote controls, which require troubleshooting and recalibration.
To troubleshoot effectively, start by inspecting the electrical connections—ensuring all wires are secure and free of corrosion. Next, verify that the power source is consistent and that circuit breakers haven’t tripped. If these elements check out, consider resetting the motor’s control settings or replacing the remote batteries. When the motor remains unresponsive, it’s helpful to follow a systematic approach:
- Check power supply and circuit integrity
- Test remote control functionality
- Inspect wiring connections for corrosion or damage
- Reset or reconfigure the control panel if necessary
By methodically addressing these potential issues, you can often resolve common installation hiccups and ensure your gate motor functions seamlessly—bringing convenience and peace of mind to your property. After all, installing gate motor isn’t just about the mechanics; it’s about creating a secure, reliable gateway to your sanctuary.
Door Not Opening or Closing Fully
When a gate refuses to yield to your commands, the frustration can feel almost personal—an obstinate sentinel resisting modern convenience. During the process of installing gate motor, such issues are not uncommon, and resolving them requires a meticulous eye and unwavering patience. Often, the problem stems from misaligned sensors or obstructed pathways, which can halt the full opening or closing of your gate.
A common culprit is the misconfiguration of the limit switches—those silent sentinels that signal the motor when to stop. Ensuring these are correctly adjusted can restore harmony to the operation. Additionally, inspecting for debris or objects caught in the gate’s movement path is essential; even a small obstruction can prevent smooth operation. For a seamless install, verifying that the wiring connections are secure and free of damage is paramount, as loose or corroded wiring can dampen the motor’s responsiveness.
To troubleshoot effectively, consider this simple sequence:
- Verify the integrity of electrical connections and remove any obstructions.
- Adjust and test the limit switches to ensure proper calibration.
- Inspect for physical blockages or damage to the gate’s track or hinges.
- Recalibrate the control system to align with the gate’s full range of motion.
By embracing this systematic approach, the hurdles in installing gate motor become manageable, paving the way for a secure and effortlessly functional entrance—an essential safeguard tailored to South Africa’s dynamic landscape.
Noise and Vibration Problems
Noise and vibration issues during installing gate motor are more than mere nuisances—they can signal underlying problems that, if left unaddressed, threaten the longevity and smooth operation of your automated gate. A rickety squeal or startling tremor is often a telltale sign of misaligned components or loose fittings, which can be exacerbated by the South African climate’s penchant for causing metal to expand or contract unpredictably.
One common culprit is improper mounting or unbalanced hardware, leading to excessive vibrations that make the entire system seem less than regal. To troubleshoot, consider inspecting the motor’s mounting brackets and ensuring they are tightly secured. Additionally, check the gear mechanisms for signs of wear or debris that might cause irregular noise. Sometimes, simple lubrication can quell squeals—think of it as a spa day for your gate motor!
In some cases, the source of vibration is the gate itself—warped hinges or uneven tracks can reverberate through the motor, amplifying the noise. To remedy this, a systematic inspection of the entire gate assembly is advisable.
- Ensure all bolts and screws are tight
- Replace worn hinges
- Clean and align the track properly
Addressing these issues not only silences the symphony of noise but also extends the life of your installing gate motor, promising a seamless and serene entrance for years to come. After all, a well-tuned gate is the hallmark of a property that values both safety and sophistication in South Africa’s vibrant landscape.
Electrical Malfunctions
Electrical malfunctions can turn the elegance of your automated gate into a frustrating ordeal. When installing gate motor systems, wiring errors or power inconsistencies often surface as the primary culprits. These issues can manifest as the motor refusing to respond or sporadically halting mid-operation, disrupting the seamless flow you desire.
To troubleshoot, start with a meticulous inspection of all electrical connections. Ensuring that wires are securely fastened and free from corrosion is vital. Sometimes, a simple reset or replacing a faulty fuse restores harmony. If the motor still does not respond, verify the power supply—fluctuations common in South Africa’s electrical grid can cause intermittent malfunctions. Consider installing a surge protector or uninterruptible power supply (UPS) for added resilience.
- Check the control panel and remote batteries for proper functioning.
- Inspect the wiring for visible damage or loose connections.
- Test the motor’s power input to ensure it receives consistent voltage.
Addressing these electrical issues swiftly ensures your installing gate motor continues to provide the security and convenience you expect, all while preserving the sophisticated aesthetic of your property. After all, reliable electrical systems are the backbone of a truly regal entrance.
Maintenance and Safety Tips for Your Gate Motor
Routine Inspections and Adjustments
Maintaining your gate motor isn’t just about prolonging its lifespan—it’s about ensuring your safety and peace of mind. Routine inspections reveal subtle issues before they escalate into costly repairs or safety hazards. Regularly check for signs of wear, corrosion, or misalignment, which can silently compromise operation. Adjustments should be made promptly to keep the system running smoothly, especially in South Africa’s diverse climate conditions. A well-maintained gate motor can operate seamlessly for years, but neglect could lead to sudden malfunctions. Remember, safety isn’t an afterthought; it’s embedded in the routine care of your automated gate.
To keep your gate motor in optimal condition, consider implementing a simple maintenance checklist. This includes lubricating moving parts, tightening loose bolts, and inspecting electrical connections. For added peace of mind, schedule professional inspections annually. These visits can uncover hidden issues that might not be immediately apparent. Additionally, observing your gate’s response during daily use can reveal early warning signs, such as unusual noise or sluggish operation. By staying vigilant, you help prevent emergencies and ensure your property remains secure and accessible.
- Ensure electrical wiring is intact and free of damage
- Check for debris or obstructions around the gate’s moving parts
- Test safety features like auto-reverse sensors regularly
Implementing these safety tips will help protect your investment and loved ones. When installing a gate motor, understanding the importance of routine maintenance and safety checks can make all the difference—turning a simple automation into a durable, reliable addition to your property. It’s this attention to detail that transforms a standard installation into a seamless, secure experience, every single day.
Cleaning and Lubrication
Keeping your gate motor in pristine condition is the secret to ensuring seamless operation and long-lasting security. Regular cleaning and lubrication are essential steps in maintaining this vital component of your property’s automation system. Dust, dirt, and debris can silently build up, causing unnecessary strain and wear on moving parts. A simple wipe-down with a damp cloth, followed by a light application of high-quality lubricant, can make a world of difference.
When lubricating your gate motor, focus on the hinges, rollers, and any sliding mechanisms. Avoid over-lubricating, as excess oil can attract dirt and create more problems. For added efficiency, follow a routine maintenance schedule, such as:
- Inspecting and cleaning electrical contacts
- Ensuring all moving parts are well-lubricated
- Removing debris from around the motor and gate tracks
In South Africa’s diverse climate, rust and corrosion can accelerate if the motor isn’t properly cared for. Regularly checking for signs of corrosion and applying protective coatings can preserve your investment. Remember, a well-maintained gate motor not only guarantees smooth operation but also enhances safety and security for you and your loved ones!
Battery Replacement and Power Backup
Ensuring your gate motor stays powered and reliable is crucial for security. Regular maintenance of the battery and power backup system prevents unexpected failures. Batteries can degrade over time, especially in South Africa’s varied climate, leading to reduced run times or complete power loss. Replacing the battery at recommended intervals keeps your gate functioning smoothly.
During installing gate motor, consider integrating an uninterruptible power supply (UPS) or a backup battery. This ensures your gate operates during power outages, providing peace of mind.
Routine checks should include testing the backup system and inspecting electrical connections for corrosion or wear. A simple step like keeping backup batteries charged and replacing them when needed can save you costly repairs later. Remember, a well-maintained power backup system is the backbone of a dependable gate motor!
Safety Features and Emergency Release
Safety features on your gate motor are essential for protecting your loved ones and property. Modern gate motors come equipped with sensors that detect obstacles, preventing accidents or damage. Regularly testing these safety mechanisms ensures they function correctly. An emergency release is equally vital, providing quick access during power failures or emergencies. Familiarize yourself with how to operate the emergency release to avoid delays when it matters most.
Routine maintenance should include inspecting safety features for signs of wear or malfunction. Keep electrical connections clean and secure, as corrosion can impair safety systems. During installing gate motor, consider integrating additional safety accessories like photocells or safety edges. These additions enhance security and ensure the gate responds promptly to obstacles.
- Test obstacle detection sensors monthly.
- Inspect emergency release mechanisms regularly.
- Keep electrical contacts free of debris and corrosion.
By prioritizing safety and performing routine checks, you safeguard your investment and ensure smooth operation. A well-maintained gate motor with reliable safety features keeps your premises secure and provides peace of mind. Remember, safety isn’t just a feature—it’s a necessity in installing gate motor systems.
Hiring Professional vs DIY Installation
Advantages of Professional Installation
While the prospect of installing a gate motor might seem straightforward, entrusting the task to professionals offers unmatched advantages. Skilled installers possess the expertise to ensure your gate motor is configured flawlessly, reducing the risk of future malfunctions. Their experience with South African electrical standards and safety protocols guarantees compliance, giving you peace of mind.
Moreover, professional installation often results in a cleaner, more efficient setup. They have access to specialized tools and high-quality components that aren’t always available to DIY enthusiasts. This precision can extend the lifespan of your gate motor and improve overall performance.
- Advanced troubleshooting capabilities
- Ensured safety features are correctly installed
- Minimized risk of electrical issues
Choosing expert installers means you save time, avoid costly mistakes, and enjoy a seamless automation experience. After all, installing gate motor is a significant investment—why not ensure it’s done right the first time?
DIY Installation Pros and Cons
Embarking on the journey of installing a gate motor can feel like stepping into a realm of mechanical enchantment. Yet, beneath the surface of this seemingly simple task lies a labyrinth of electrical intricacies and safety protocols that demand the finesse of seasoned artisans. While DIY installation may seem tempting—perhaps fueled by the promise of savings—consider the hidden perils lurking in uncharted territory. A misstep in wiring or misalignment can turn your enchanted entrance into a source of frustration and costly repairs.
Choosing to hire professional installers transforms this quest into a seamless voyage. Skilled artisans bring a treasure trove of specialized tools and high-quality components, ensuring your gate motor is configured with precision. They possess the knowledge to navigate South African electrical standards effortlessly, safeguarding your property and loved ones. For those who value peace of mind, this expert touch guarantees safety, longevity, and optimal performance—making the initial investment truly worthwhile.
When to Call a Professional
When it comes to installing a gate motor, the decision between DIY and hiring a professional can be pivotal. While some homeowners are tempted by the allure of saving money, the risks often outweigh the benefits. Installing a gate motor involves complex electrical work, precise alignment, and adherence to South African safety standards—areas where expertise truly matters.
Opting for professional installation ensures that the job is done correctly the first time. Skilled installers bring specialized tools and high-quality components that boost the longevity and performance of your gate motor. Moreover, they can navigate local regulations, preventing costly compliance issues down the line. For those who value safety and peace of mind, engaging a qualified technician transforms a potentially frustrating task into a seamless process. When considering installing gate motor, recognize the importance of expert guidance to avoid pitfalls and guarantee a secure, efficient setup.