Understanding Gate Motor Batteries
Types of Gate Motor Batteries – Different types of batteries used in gate motors (e.g., lead-acid, lithium-ion)
Understanding the nuances of gate motor batteries is essential for maintaining smooth and reliable operation. The first step in mastering how to test gate motor battery lies in recognising the diverse types available. Most commonly, these batteries fall into two categories: lead-acid and lithium-ion. Lead-acid batteries, often found in older models, are robust and cost-effective but require regular maintenance. Conversely, lithium-ion batteries, prized for their lightweight design and longer lifespan, are increasingly popular in modern gate systems.
Knowing the specific type of battery in your gate motor can influence how you approach testing. For example, lead-acid batteries tend to display voltage drops when failing, while lithium-ion batteries may show reduced capacity over time. To determine the health of your battery, it’s worth familiarising yourself with their unique characteristics.
When considering how to test gate motor battery, a few key factors come into play, including voltage levels, capacity, and overall condition. A thorough understanding of these battery types ensures you address issues with precision and confidence.
Importance of Battery Maintenance – Why regular testing and maintenance are essential for gate motor batteries
In the shadowy world of automation, your gate motor’s battery is the silent guardian of convenience. Yet, many overlook its importance until a malfunction strikes, leaving you stranded. Regular testing and maintenance of your gate motor battery are vital, not just for peace of mind but to prevent unexpected failures that could compromise security or convenience. When you understand how to test gate motor battery effectively, you unlock the secret to sustained performance and longevity.
Beneath the surface, a battery’s true condition can be elusive. Voltage readings alone may not reveal slow capacity loss or internal deterioration. That’s why consistent inspection—checking voltage levels, capacity, and overall health—is essential. This vigilance ensures that your gate system remains reliable, avoiding costly repairs or replacements down the line.
Maintaining your battery isn’t just about avoiding inconvenience; it’s about safeguarding the integrity of your entire access control system. Regular testing acts as an early warning system, alerting you to potential issues before they escalate. When you know how to test gate motor battery properly, you take control—preserving the seamless operation of your gate and the security it provides.
Signs of a Failing Battery – Common indicators that your gate motor battery may need testing or replacement
In the grand theatre of automation, a gate motor’s battery often plays the unassuming role of the dependable sidekick—until, of course, it doesn’t. A sudden failure can transform a seamless entrance into a frustrating ordeal, often at the most inconvenient moment. Recognising the signs of a failing battery is vital, and knowing how to test gate motor battery effectively can save you from those embarrassing moments of gate gatecrashing your own security system.
Common indicators include sluggish responses, delayed opening or closing, or the gate refusing to move altogether. You might also notice a rapid drain in battery life, or the battery becoming noticeably warm during operation—an unwelcome sign of internal distress. These symptoms aren’t just minor inconveniences; they’re the system’s way of signalling that your battery’s days are numbered.
To keep your gate running smoothly, watch out for these telltale signs, and remember that a thorough test can reveal hidden issues before they escalate. Whether it’s a quick voltage check or a more detailed capacity assessment, understanding how to test gate motor battery is your best defence against unexpected breakdowns.
Tools Required for Testing Gate Motor Batteries
Multimeter or Volt-ohm Meter – How to select and use a multimeter for voltage testing
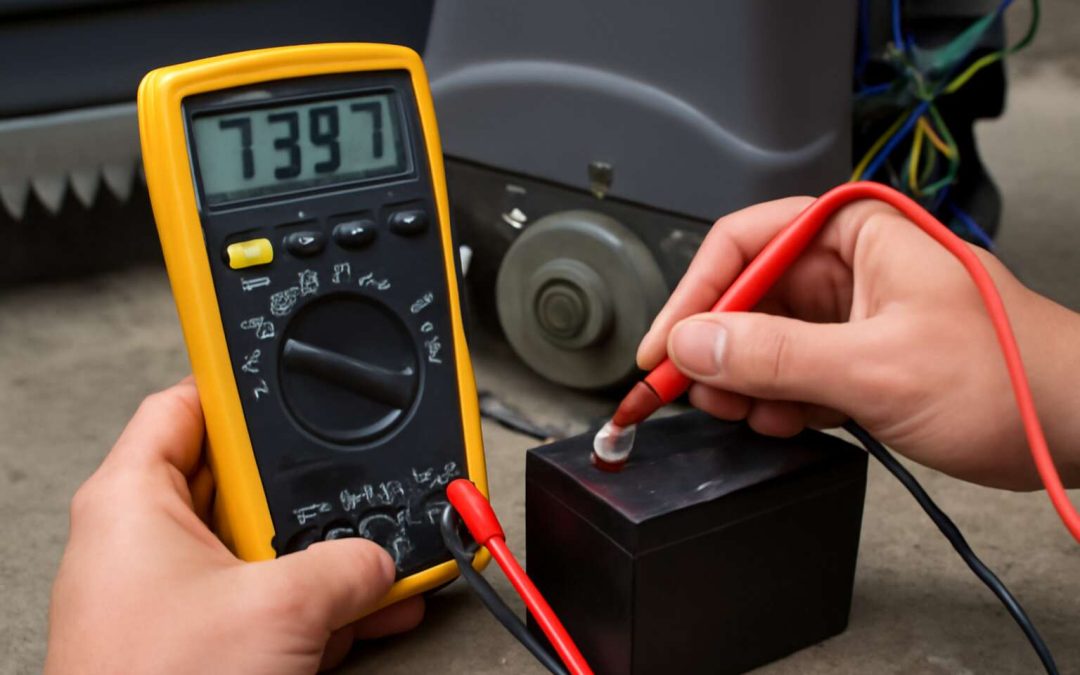
In the delicate dance of electronic guardianship, understanding how to test gate motor battery becomes an essential skill—one that can prevent inconvenient shutdowns and costly repairs. At the heart of this process lies the humble multimeter or volt-ohm meter; a tool of silent precision whose role is paramount in unveiling the true health of your battery. Selecting the right multimeter involves considering its range, accuracy, and durability, ensuring it can withstand the demands of your testing environment. When used properly, this device transforms into a gateway to clarity, revealing voltage levels that whisper secrets about the battery’s vitality.
For those venturing into the realm of electrical diagnostics, a simple yet powerful technique awaits. With the multimeter set to measure voltage, place the probes carefully across the battery terminals. A healthy lead-acid or lithium-ion battery should display a voltage close to its rated capacity—any significant deviation signals a potential problem. Remember, a multimeter’s versatility extends beyond mere voltage testing; it can also detect resistance and continuity, offering a comprehensive picture of your gate motor’s power source. Mastering how to test gate motor battery with this instrument is like decoding a vital heartbeat—an essential step in safeguarding your automated gate’s seamless operation.
Battery Load Tester – Using a load tester to assess battery capacity and performance
In the labyrinth of automated gate systems, understanding how to test gate motor battery becomes an essential ritual—an act of safeguarding the silent sentinels that keep our homes secure. Among the arsenal of tools at your disposal, a battery load tester emerges as an indispensable instrument, capable of unveiling a battery’s true resilience under simulated operational stress. This device doesn’t merely measure voltage; it assesses the battery’s capacity to deliver sustained power when it matters most, revealing subtle signs of fatigue that elude simple voltage checks.
Using a load tester involves connecting it to the battery terminals with care, then applying a controlled load that mimics the demands of the gate motor during peak operation. A well-calibrated load test can expose internal weaknesses—such as diminished capacity or compromised internal resistance—that might otherwise go unnoticed until failure.
- Ensure the load tester is compatible with your battery type—lead-acid or lithium-ion—before proceeding.
With patience and precision, this process illuminates the hidden vulnerabilities lurking within your power source, providing peace of mind or prompting necessary replacements before inconvenient malfunctions occur. When it’s time to check how to test gate motor battery, a load tester becomes your most trustworthy ally, transforming complex diagnostics into a clear, actionable insight.
Safety Equipment – Necessary safety gear for battery testing procedures
Ensuring the longevity and reliable performance of your gate motor battery demands more than just a casual glance at voltage readings. Before diving into testing, it’s paramount to equip yourself with the proper safety gear, transforming a potentially hazardous task into a secure and efficient process. Safety should never be compromised when working with batteries, which can emit explosive gases or cause chemical burns if mishandled.
Essential safety equipment includes a pair of insulated gloves, safety goggles, and a well-ventilated workspace. These precautions protect against accidental sparks, acid spills, and harmful fumes. Additionally, wearing long sleeves and ensuring the area is free from open flames or static electricity significantly reduces risk. Remember, a meticulous approach to safety not only preserves your health but also ensures accurate results when testing your gate motor battery.
While comprehending how to test gate motor battery might seem straightforward, adhering to safety protocols elevates the entire process—turning a routine check into a confident, controlled diagnostic. After all, a well-prepared technician approaches each task with caution, transforming potential peril into a seamless inspection experience.
Step-by-Step Guide to Testing Your Gate Motor Battery
Preparing the Gate Motor and Battery – Ensuring safety and proper setup before testing
Before diving into the intricacies of testing your gate motor battery, it’s crucial to prioritise safety and proper setup. A sudden spark or unexpected short circuit can turn a routine check into a hazardous situation. Ensuring all safety measures are in place is not just recommended—it’s essential. Disconnect the power supply to prevent accidental activation, and wear safety goggles and gloves to protect yourself from potential sparks or acid leaks.
Next, prepare your testing environment meticulously. Clear the area around the gate motor and battery, removing any debris or obstacles that could interfere with your work. Confirm that your multimeter or volt-ohm meter is calibrated correctly, and set it to the appropriate voltage range. For accurate results, you should also verify that your battery terminals are clean and free from corrosion, which could distort your readings. Proper preparation ensures that when you start to learn how to test gate motor battery, your measurements are both safe and reliable.
Checking Voltage with a Multimeter – Measuring the battery’s voltage and interpreting results
Testing your gate motor battery is a straightforward process that can save you from unexpected failures. The first step is to check the voltage with a reliable multimeter. Set your multimeter to the appropriate voltage range—usually 20V for most gate motor batteries—and carefully place the probes on the battery terminals. A healthy, fully charged battery typically reads around 12.6 volts for lead-acid types or higher for lithium-ion variants.
If the voltage drops below 12.4 volts, it’s a sign that the battery may be nearing the end of its lifespan or needs recharging. Low readings often point to a failing battery, especially if the gate motor isn’t responding as it should. Keep in mind that a reading of less than 12 volts usually indicates a significant reduction in capacity, making it crucial to determine how to test gate motor battery properly before further use.
Remember to interpret your results carefully; a high voltage doesn’t always guarantee the battery’s overall health. Sometimes, a battery can show decent voltage but struggle under load. For a more comprehensive assessment, consider combining voltage testing with a load test, which provides insight into the battery’s true capacity to power your gate motor reliably. This step can help you avoid the inconvenience of sudden breakdowns and ensure your gate continues to operate smoothly for years to come.
Conducting a Load Test – Applying a load to assess the battery’s true capacity
Testing the true capacity of your gate motor battery goes beyond just checking the voltage. A load test is an essential step to determine how well your battery can perform under real-world conditions. When the gate motor is in operation, it demands a substantial burst of power—much more than a simple voltage reading can reveal.
To conduct a load test, you’ll need a battery load tester designed specifically for this purpose. Carefully apply the load to the battery, following the manufacturer’s instructions, and observe how the voltage responds. During the test, keep a close eye on any significant voltage drop, which may indicate that the battery is struggling to deliver the necessary power. If you notice that the voltage dips below the optimal range, it’s often a sign that the battery’s capacity is waning.
Remember, a proper load test is the most reliable method to understand how to test gate motor battery. It offers a window into the actual performance, helping you avoid unexpected failures and ensuring your gate continues to operate smoothly for years to come.
Evaluating Test Results – Determining if the battery is healthy or needs replacement
Knowing how to test gate motor battery performance is crucial for preventing unexpected failures that can leave your gate vulnerable. Once you’ve completed a load test, the moment of truth arrives—evaluating the test results. This step is where you determine if your battery is still capable of delivering reliable power or if it’s time for a replacement. A healthy battery should maintain its voltage under load, with minimal voltage drop during testing. If the voltage dips significantly below the recommended range, it signals a decline in capacity, potentially jeopardising the smooth operation of your gate.
To interpret these results accurately, consider the following indicators:
- Consistent voltage readings during load testing suggest a healthy battery.
- Rapid voltage drop indicates the battery is struggling to supply power.
- If the voltage remains low even without load, the issue might lie elsewhere, but it still warrants further testing.
Understanding how to test gate motor battery performance isn’t just about numbers; it’s about safeguarding your investment and ensuring seamless operation. When test results point towards diminished capacity, proactive replacement can save you from being stranded in front of your gate at the worst possible moment.
Interpreting Battery Test Results
Voltage Recommendations for Different Batteries – Standard voltage levels for various battery types
Understanding the voltage levels of your gate motor battery is crucial for ensuring its optimal performance and longevity. When learning how to test gate motor battery, one of the most straightforward indicators is the voltage reading. Different batteries have specific voltage thresholds that signal whether they’re healthy or in need of replacement.
For instance, a standard lead-acid battery typically should read around 12.6 volts when fully charged. Anything significantly below this, especially under 12 volts, suggests the battery is discharged or possibly failing. Lithium-ion batteries, on the other hand, often operate at higher voltages, usually around 13.2 to 13.8 volts when fully charged. Recognising these voltage recommendations for different batteries allows you to interpret test results with confidence and avoid unnecessary replacements.
In practice, measuring the voltage provides a quick snapshot, but it’s only part of the picture. For a comprehensive assessment, combining voltage checks with load testing can reveal whether your battery maintains its capacity under real-world conditions. When learning how to test gate motor battery, knowing the standard voltage levels helps demystify the process and ensures your gate operates smoothly for years to come.
Understanding Voltage Drop During Load Testing – What significant drops indicate about battery health
When testing a gate motor battery, understanding voltage drop during load testing can reveal hidden weaknesses lurking beneath the surface. A healthy battery should maintain a steady voltage under load, but a significant drop signals trouble brewing. If your voltage plummets more than a few volts when a load is applied, it’s a clear sign that the battery’s capacity is compromised. This rapid decline often indicates sulphation or internal degradation, which could leave your gate motor stranded in critical moments.
To interpret these results accurately, keep in mind that a voltage drop of over 0.5 volts during load testing for lead-acid batteries suggests they are nearing failure. For lithium-ion variants, a similar trend applies, but with higher baseline voltages. When learning how to test gate motor battery, pay close attention to these fluctuations—your gate’s reliable operation depends on it!
- Consistent voltage during load suggests a healthy, well-maintained battery.
- Sharp voltage drops point to a weakened or failing battery that needs replacing.
By recognising these signs early, you can prevent unexpected gate malfunctions, ensuring smooth operation and extending the lifespan of your battery. The secret lies in knowing how to test gate motor battery effectively—understanding the significance of voltage drop can make all the difference.
When to Consider Battery Replacement – Thresholds and signs that suggest it’s time for a new battery
When it comes to safeguarding your gate’s reliable operation, understanding when a battery has reached its breaking point is crucial. A battery that consistently underperforms or exhibits abnormal voltage drops isn’t just a minor inconvenience—it’s a silent harbinger of failure. Recognising the thresholds that signal it’s time for a new battery can save you from unexpected malfunctions and costly repairs.
For lead-acid batteries, a voltage reading below 12.4 volts during a test often indicates diminished capacity, while lithium-ion batteries should maintain higher baseline voltages, typically above 3.0 volts per cell. When conducting your how to test gate motor battery process, be alert to signs such as a sudden voltage drop of over 0.5 volts under load, which suggests internal degradation.
Consider these key signs that point to the need for a replacement:
- The voltage drops sharply during load testing, indicating weakened capacity.
- The battery fails to hold a steady voltage over time, hinting at sulphation or internal damage.
- Significant visual wear or corrosion on terminals and casing.
- Persistent inability to start the gate motor even after a full charge.
In essence, if your measurements and observations reveal consistent underperformance, it’s a clear call to consider a new battery. Recognising these thresholds early allows you to avoid the peril of sudden gate failures, ensuring your automation remains seamless and dependable. After all, understanding how to test gate motor battery isn’t just about numbers; it’s about safeguarding the integrity of your access point and trusting the unseen power behind it.
Additional Tips for Maintaining Gate Motor Batteries
Regular Testing Schedule – How often to test your gate motor battery
Maintaining optimal performance of your gate motor hinges on a consistent testing schedule for the battery. Regular testing ensures you catch potential issues before they cause inconvenience or costly repairs. Experts recommend testing your gate motor battery at least every six months, especially in extreme weather conditions where battery performance can fluctuate.
Implementing a routine testing schedule can be straightforward if you follow a few simple steps. For example, using a multimeter to check voltage levels periodically helps verify whether the battery is holding charge properly. Additionally, performing a load test annually gives a more accurate picture of the battery’s capacity and overall health.
Adopting these practices prevents unexpected failures and prolongs the lifespan of your gate motor battery. Remember, consistent checks are key to maintaining a reliable gate system and avoiding downtime.
Proper Charging and Storage – Best practices for prolonging battery life
Prolonging the lifespan of your gate motor battery hinges on proper charging and storage practices. An often overlooked aspect is ensuring the battery is kept in optimal conditions when not in use. Proper storage in a cool, dry environment helps slow down the natural degradation process, especially during colder months when batteries tend to lose charge more rapidly.
When it comes to charging, always use the charger recommended by the manufacturer. Overcharging or using incompatible chargers can lead to reduced capacity and shortened battery life. It’s also wise to disconnect the battery if the gate motor isn’t in use for an extended period, preventing unnecessary drain. For added peace of mind, periodically inspecting the battery terminals for corrosion and ensuring they are clean enhances conductivity and longevity.
- Regularly check the battery’s charge level
- Avoid exposing the battery to extreme temperatures
- Use appropriate safety gear during maintenance
By integrating these simple yet crucial practices into your routine, you not only extend the life of your gate motor battery but also ensure smooth, reliable operation for years to come. Knowing how to test gate motor battery effectively complements these efforts, giving you a comprehensive approach to maintenance and performance assurance.
Troubleshooting Common Battery Issues – Addressing frequent problems like poor performance or failure to charge
Even the most reliable gate motor can falter unexpectedly, leaving you stranded at the worst possible moment. Knowing how to test gate motor battery effectively can be the difference between a quick fix and a costly replacement. Hidden within the subtle signs of decline—such as sluggish response or inconsistent operation—lies the true story of your battery’s health. Often overlooked, proper testing demystifies the process and provides clarity amid uncertainty.
When performing the test, it’s essential to start with a clean, well-maintained setup. Using a multimeter or volt-ohm meter, measure the voltage across the battery terminals. If the reading dips below the manufacturer’s recommended voltage—typically around 12.6 volts for a fully charged lead-acid battery—it signals a potential issue. For lithium-ion batteries, the threshold varies slightly but generally hovers around similar levels. Keep a close eye on voltage fluctuations during load testing, as significant drops often reveal weakened capacity.
To gauge the battery’s true capacity, applying a load with a battery load tester can uncover subtle performance issues that static voltage checks might miss. If your readings are inconsistent or fall short of expected values, it’s worth exploring further. Sometimes, corrosion on the terminals or a build-up of dirt hampers conductivity, making your battery seem worse than it truly is. Regularly inspecting and cleaning the terminals can prevent unnecessary replacement.
In the world of gate motor maintenance, understanding how to test gate motor battery isn’t just a routine task—it’s a vital diagnostic tool. It equips you with the insight needed to anticipate failures, plan repairs, and ultimately ensure the longevity of your gate system. When in doubt, repeat the test and compare results over time; a gradual voltage decline often precedes complete failure, giving you a head start on proactive maintenance.
Professional Help and When to Seek It
When to Call a Technician – Signs that require professional diagnosis
When it comes to the intricate dance of safeguarding your gate’s smooth operation, recognising when professional help is needed can be a game-changer. While learning how to test gate motor battery at home empowers you, some signs hint that it’s time to call in the experts. Unusual noises, inconsistent opening and closing, or frequent failure to respond are red flags that demand a precise diagnosis. Attempting to troubleshoot complex electrical issues without the right tools can sometimes do more harm than good.
In such cases, seeking a professional ensures that your gate’s motor and battery are thoroughly examined with specialised equipment. They can perform advanced diagnostics to accurately assess battery health and identify underlying problems. Remember, when in doubt, it’s better to consult a technician—especially if you notice persistent issues that do not resolve after basic testing. Proper diagnosis not only prolongs the life of your gate motor battery but also maintains the security and convenience your automated gate provides.
Benefits of Expert Testing – Why professional assessment may be more reliable
When your gate refuses to open or closes with the usual flair, it’s tempting to blame a stubborn gate motor or a dead battery. But before diving into DIY diagnostics, consider that professional help can often reveal hidden gremlins lurking in your gate’s electrical system. Knowing how to test gate motor battery properly can save you time, money, and a headache or two.
Expert technicians employ specialised diagnostic tools that far surpass a simple multimeter. They can perform comprehensive load testing and evaluate voltage drops with precision — something far beyond the capabilities of a casual DIY attempt. This thorough approach ensures that every component, from the battery to the motor itself, is scrutinised and assessed accurately.
- Advanced diagnostics provide peace of mind
- Correctly identify potential issues before they escalate
- Extend the lifespan of your gate motor and battery
In essence, professional assessment offers a reliability that DIY testing can’t match. It’s the difference between a quick fix and a costly misdiagnosis. When your gate’s behaviour is more unpredictable than a cat on catnip, calling in the experts becomes not just wise — it’s essential for maintaining security, convenience, and peace of mind.